Life-Changing PowerPoint Quick Access Toolbar Secrets
PowerPoint Pro Moves S1E2
If we could show you an easy way to radically improve the speed and quality of your PowerPoint slide design workflow, would you be interested? What if we could also show you how to reduce your overall effort while we’re at it? What if we could skip this obvious, rhetorical line of questions and get to showing you what we have in mind? OK, you win…

Four promises sure to change your (PowerPoint) life…
Friendsters, we’re ready to change your PowerPoint life by dropping four key bits of knowledge on your doorstep. In this PowerPoint Pro Moves blog post, we’ll show you:
- How PowerPoint’s Quick Access Toolbar holds the power to unlock massive speed, precision, and workflow efficiency for you, turning two to four user inputs into simple one-click affairs.
- Next, how to customize the Quick Access Toolbar, starting with how to remove and add features.
- Then, once you’re working with a clean slate, we’ll share our “go to” Quick Access Toolbar set up, which includes 19 life-changing shortcut buttons.
- Finally, as the coup de gras, we’ll share our super-secret “mind meld” technique that will allow you to conjure features from your Quick Access Toolbar without the use of any additional mouse clicks. Moons will turn red and animal migration patterns will shift when people see you using this secret tip (not really).
If this sounds like something up your alley, let’s get going!
Cool. Um, what is the Quick Access Toolbar?

Figure 1: The Quick Access Toolbar = the default strip above your main tool ribbon.
If you are asking yourself this question, PLEASE go easy on yourself. We’ve considered ourselves “power users” of Microsoft Office and PowerPoint for awhile and we’ll admit that we just started taking advantage of this amazing feature several years ago. So, what is this magical Quick Access Toolbar—and where can you find it? As the diagram above (with the horrible pen tool markup) illustrates, PowerPoint’s Quick Access Toolbar is that teeny tiny strip of orange nestled above your main tool ribbon.
As its descriptive name implies, you can place frequently accessed tools and functions there to provide—wait for it—Quick Access. Fine tuning the Quick Access Toolbar will unlock your speed and precision, so it’s worth a few minutes to better understand how to set it up. If you take a look at the example setup above, you’ll notice 19 “go to” features pre-loaded and ready at a moment’s notice. This is one of the secrets to designing high-quality slides in a fraction of the time of even the most seasoned slide designers working without its benefit.
Why you don’t already know about the Quick Access Toolbar?
If you really feel the need to play the “blame game” here, just go ahead and blame Microsoft. No, in all seriousness, you’ve probably been using the QAT for years and just never knew it.

Figure 2: A default Quick Access Toolbar. Underfed and malnourished. Sad, really.
To be fair, Microsoft places some very helpful items on the QAT; y’know, things the average Joe/Jane will need to know right off the bat: Save (Ctrl+S), Undo (Ctrl+Z), Redo (Ctrl+Y), and start the presentation (F5). We’re sure you’d agree those are all very important functions, but for anyone but the most junior user, you’ve probably internalized each function’s keyboard shortcut, so we’d recommend clearing out your QAT real estate for more complex and advanced operations.
How do I customize the Quick Access Toolbar?
The first step is to clean house and blow out all the trash, starting with those default Quick Access Toolbar icons. Fortunately, this is pretty easy:
- Hover your mouse on any Quick Access Toolbar icon.
- Right-click your mouse.
- Select “Remove from Quick Access Toolbar”
Rinse and repeat until you’ve got a clean slate to work from.
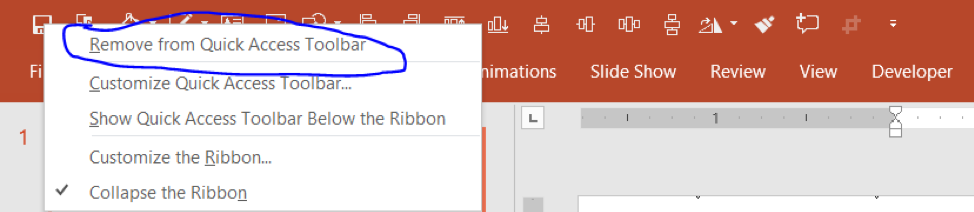
Figure 3: How to remove tools from your Quick Access Toolbar
There, all better. You have a truly clean slate to work with. The world, our PowerPoint friend, is truly your oyster. You can start adding features to your Quick Access Toolbar almost as easy as you removed them. Have a look…
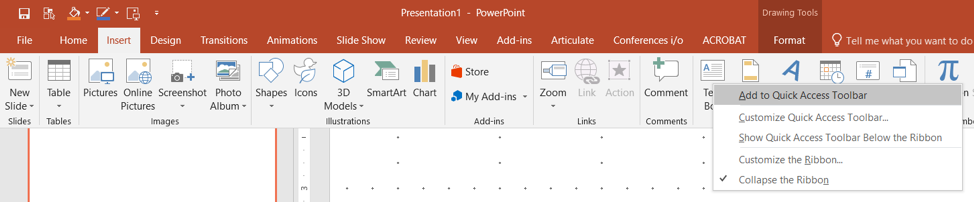
Figure 4: Adding the Text Box feature to the Quick Access Toolbar
- Find a feature you want to add to your Quick Access Toolbar (example: Insert Text Box)
- Right-click your mouse.
- Select “Add to Quick Access Toolbar”.
19 “Gotta Have ‘Em” Quick Access Toolbar Recommendations
At this point, we’re guessing that you’re having mixed feelings. You are, no doubt, deeply troubled by the sorry state of your default Quick Access Toolbar. Meanwhile, you are confident that you can get rid of all those vestigial icons and you know how to replace them with “mo’bettah” icons. However, you are probably a little nervous too. “Gosh,” you’re thinking, “if I just knew some folks with years of experience who could get me started in knowing which PowerPoint features I should add to my Quick Access Toolbar.” OK, we sincerely hope you’re not going along this mental journey with us, but if you were, here are the go-to, must-have, can’t-live-without-‘em icons many of us use on a daily basis. You are more than welcome to steal these and try them out for yourself…

Figure 5: Our Recommended Go To Quick Access Toolbar Setup
In order (from left to right)

1. Save
We left one soldier from the original four, just to pay respects to the hard-working crew up in Redmond, WA.
2. Selection Pane
The Selection Pane is your new jam. Seriously. It provides a super clean list view of every asset (image, text, video, shape) on your slide, and makes it a snap to rearrange the layer hierarchy.
3. Shape Fill
You’re going to need to fill plenty of shapes and text boxes with color. Adding it here removes the need to hunt for this go-to feature.
4. Shape Outline
When you want to add that outline to an asset, the Shape Outline tool will be here ready and waiting.

5. Insert Text Box
Truly customized slide designs often rely on inserting text boxes independent of a template. Having this feature on call makes a lot of sense.
6. Insert Pictures
Slides should be visual, so you will want quick access to your photos. Now you will.
7. Insert Shapes
Think beyond the arrow or starburst, nuestros amigos. Shapes such as semi-transparent rectangles add elegance when placed between text and full-bleed imagery. You’ll want Insert Shapes on the Quick Access Toolbar.

8. Align – Distribute (all 8 of them)
Stop wasting time with the arrangement of your assets and use the amazing align and distribute tools that PowerPoint has HIDDEN away! You can arrange these tools a bit different than Microsoft; here’s how to get your Align and Distribute roll on…
8a. Left Align
Have you ever had to straighten out a deck of cards before shuffling them? We bet you took that jagged deck of cards and started tapping it against the tabletop to realign your deck, didn’t you? Of course you did! This is precisely why we place the Align tools in the Quick Access Toolbar. These amazing time savers are normally hidden away in the Format menu and are, with apologies to Damon Wayans, a “Major Payne” to access quickly. When you align them like so, you won’t believe how much faster you can work.
8b. Right Align
8c. Top Align
8d. Bottom Align
8e. Align Objects Center
8f. Align Objects Middle
8g. Distribute Horizontally
If you have three or more objects that require even distribution, just set the far left and far right objects at the desired location, then select all three objects and click this Distribute Horizontally. Consider your life changed.
8h. Distribute Vertically
This works identically as above but with vertical distribution.

9. Rotate Objects
When you need to rotate or flip objects, you usually need to do a whole lotta huntin’ around. No longer, friends.
10. Format Painter
Have you ever wanted to copy/paste the format of an object (it’s color, transparency, shadow, size)? Just select the item you want to mimic, click this shortcut and get to gettin’. (Super power hint: double click this icon to “load” format painter and every item you touch until you hit the ESC key will get the full format treatment).
11. Insert Comment
Forget tracking your presentation changes on an annoying email chain sure to get lost. When you want to make a review note on an associate’s slides, you are now one click away from attaching your comments to the slide itself.
12. Crop
Pro designers are often cropping images within PowerPoint to achieve all sorts of artistic and animation effects. Typically, accessing the Crop tool is at least two, often three mouse maneuvers away. Why not make it one?
So, there’s a rundown of our 19 Quick Access Toolbar recommendations. Of course, based on your needs, yours may look quite different. The bottom line here is to make it your own and optimize your work flow. By the way, if you need help finding all of these within the various PowerPoint ribbon areas, check out our PowerPoint Pro Moves video blog:
How can I use my mind to conjure my Quick Access Toolbar (and change animal migration patterns)?
You’re no doubt guzzling the Quick Access Toolbar Kool-Aid at this point, but are you ready for some David Blaine-level stuff? What if you could access your Quick Access Toolbar features without even using your mouse? You can, and best of all, it requires no additional coding. Actually, all you need to remember is one single key stroke: Alt. Let’s check it out in action and you’ll see how the dominos fall down.
In the illustration below, you’ll see our amazing Quick Access Toolbar panel before we hit the ALT key. The situation is pretty normal, right? Let’s continue…
Figure 6: The Quick Access Toolbar before we tap the ALT key.
Below is what shows up the second we tap that ALT key. Shazam!—a bunch of numbers overlay over my Quick Access Toolbar icon buttons. Notice that they follow a 1-9 sequence, then back down using an 09—01 sequence (and then continue on)?
Figure 7: The Quick Access Toolbar after we tap the ALT key.
These alphanumeric overlays are what is known as “dynamic shortcuts”. Tapping the ALT key unlocks a sequence of shortcut “breadcrumbs” that make the dark art of remembering shortcuts much more accessible to the masses. Dynamic shortcuts were introduced with Windows 7, so they’ve been around for a while now, but the real story here is the power they give to your Quick Access Toolbar panel. Let’s say you want to insert a picture. If you placed the Insert Picture as your 6th Quick Access Toolbar icon (like we have above), all you’ll need to do now is type ALT+6 (tap them in sequence independently, do not hold down ALT while tapping the 6 key) and suddenly your file navigator opens up, awaiting your desired image. Try it. It’s pretty cool.
To take advantage of this dynamic shortcut capability, order your Quick Access Toolbar icons with your absolute favorites on the far left. This allows you to make ALT+1, 2, 3, etc. an instant “call”. We use the Selection Pane (ALT+2) all the time, so that’s why it’s #2. Pretty soon, you’ll know each Quick Access Toolbar shortcut like the back of your hand. To a casual observer, you’ll seem like Neo in the Matrix, aligning assets and inserting images with telepathic efficiency.
Are you not entertained?
That’s it for today folks. You’ve learned about the Quick Access Toolbar, how to customize it, and how to use mind meld powers to put the afterburners onto your PowerPoint workflow skills. We can’t wait to hear about your Quick Access Toolbar success stories, so keep the cards and letters coming to ask about other PowerPoint workflow related topics. We’ll be producing new videos and blog posts workflow tip on a regular basis, so stay tuned for more PowerPoint Pro Moves!